Wednesday, 16 October 2013

Coconut Whispers


Okay okay, so I know that posting 2 cookie recipes in a row is probably a food blogging no-no but I couldn’t help posting this beautiful recipe. Now I collect baking books/ magazines like you wouldn’t believe, and this recipe is a slight adaptation from one of my more worn-down, mixture splattered books.


So this is a slightly adapted version as I felt that an amazingly crispy coconut cookie such as this deserves to be sandwiched between a thick layer of butter frosting.


With only 5 ingredients and 1 bowl they are so delicious and easy to make that I am surprised I have never come across them before! So take the opportunity to impress all of your friends with your very fancy frosted double-decker cookies.


Coconut Whispers

Ingredients:
Butter (softened) 55g
Sugar 115g
Vanilla Essence 1/2 t
Egg 1
Coconut 150g
Self Raising Flour 1 1/2 C

Icing*:
Butter 50g
Icing Sugar 1C
Vanilla Essence 1t

*Now I usually 'wing it' and rely on my bakers intuition when it comes to frosting so these are just generalized measurements. But don't be scared, live a little and abandon your measuring cups and spoons for a moment!

Method:
Pre-heat the oven to 325F/160C and line two baking trays with paper.
Cream together the butter and sugar until light and fluffy, then add the vanilla essence and the egg and beat well.

Stir in the coconut then the flour, mix well to combine
Place teaspoon sized balls onto the tray and leave in the fridge for 10-15 minutes (this helps them keep their shape)

Bake for 25-30 minutes until golden, leave them on the baking tray for approx. 5 minutes before transferring to a cooling rack


Once cool pair biscuits of similar size and place 1t of the frosting in the middle of the biscuits, gently press down until the frosting reaches the edges. Store in an air-tight container in the cupboard, they last for about 2 days.


Saturday, 12 October 2013

The Ultimate Rainy-Day Chocolate-Chip Cookies


If you know me then you know that summer is most definitely my favorite part of the year, so you can imagine how cheated I felt when I woke up to gale force winds and thunderstorms outside.


But I waste no excuse to bake and found that in a situation like this there was no option but to stay in my pajamas, bake cookies and watch an entire season of friends.


As chocolate chip cookies were the first thing I ever learnt to bake this post definitely brings back memories of helping my Nana in the kitchen by creaming the butter and sugar as well as exercising my role as the official cookie dough taster. As my love of baking really started during making these with my Nan I believe that a chocolate chip cookie recipe is one that all bakers should have in their handbook. So here I give you the Ultimate Rainy-day Gooey Chocolate Chip Cookies!


As this was 'spur of the moment' cookie making (isn't it always!) so the original recipe and suggested you refrigerate the dough for 24 hours (I love cookies but there is no way I was waiting that long) and used a combination of Cake Flour and Bread flour, which you can view here.


The Ultimate Rainy-Day Gooey Chocolate-Chip Cookies

Ingredients:
3 2/3 cups minus 2 tablespoons Plain Flour
1 1/4 teaspoons baking soda

1 1/2 teaspoons baking powder

1 1/2 teaspoon sea salt

2 1/2 sticks unsalted butter, softened

1 1/4 cups brown sugar

1 cup plus
2 tablespoons granulated sugar

2 large eggs

2 teaspoons vanilla extract

2 2/3 cup chocolate chips + chopped cooking chocola

Directions:
1. Preheat oven to 180C
2. In a large mixing bowl, sift together flours, baking soda, baking powder and salt. Set aside.

3. Using an electric mixer, cream together butter and sugars. Mix for about five minutes to ensure a light and creamy texture. 
4. Add eggs one at a time, mixing well after each addition. Pour in vanilla and mix well.

5. Add flour mixture to butter mixture and stir until combined, avoiding over-mixing. Add chocolate chips. (try not to eat the entire mixture)


6. Roll into a thick rope and refrigerate for at least 15minutes.

7. Slice rounds of dough using a sharp knife and place onto a cookie sheet.
8. Bake for approximately 12 to 15 minutes, or until light golden brown.
9. Remove from oven and let cookies cool on baking sheet for 10 minutes.
10. Transfer to a cooling rack and allow cookies to cool completely.

I took this opportunity to also make ice-cream cookies which are possibly the most amazing way to eat cookies. The logistics are quite difficult so stay with me;
1. Take two cookies
2. Fill with as much ice-cream as possible!


*Proceed to eat the entire batch with ice-cream and never regret it because cookies are amazing and regretting it would hurt their feelings


Monday, 7 October 2013

Caramel Slice


There is nothing better than summer in New Zealand.

Now don’t get me wrong, I like cuddling up with a hot drink in winter as much as the next person. But I love nothing more than being able to swap my jumpers and scarves for a shorts and a pair of sunnies.  It seems to me that once summer arrives no-one wants to do much besides laze around on the beach with a good book and make up for the Vitamin C lost over winter. So I present an easy yet amazingly delicious recipe, which will ensure you aren’t wasting any tanning time inside your kitchen!


While I was weary of making my own caramel for the first time it is incredibly easy and doesn’t have the same dense taste you get when using bought tinned caramel.


CARAMEL SLICE

Base:
1/2 cups self raising flour
1 cup plain flour
1/2 c coconut
1/2 cup brown sugar
125 g unsalted butter, melted

Filling
60g butter, extra
1/4 cup Chelsea Golden Syrup (Tin)
1 X 395 g can sweetened condensed milk
*¼ LSA
*¼ Almonds, Finley chopped

*Now in an effort to make these little more guilt free I added LSA and chopped Almonds to the base, which created a lovely subtle nutty taste in the slice. LSA is ground Linseed, Sunflower seeds and Almonds, which can be found at most supermarkets and is super healthy!

Icing:
150 g Cooking Chocolate, broken into pieces
50 g unsalted butter

METHOD:
BASE:
1. Preheat the oven to 180°C. Grease and line a 17cm x 30cm sponge roll pan with baking paper.
2. Combine the flour, baking powder, LSA, almonds and brown sugar in a medium-sized bowl. Stir in the melted butter. Press the mixture into the prepared pan.
3. Bake for 12-15 minutes. (If your base looks a little uncooked its ok as you will bake it again once the caramel topping is added)


FILLING:
1. Combine the HIGHLANDER Sweetened Condensed Milk, golden syrup and butter in a small saucepan. Cook over a low heat, stirring constantly, until boiling. Continue to cook for 5 minutes, while stirring constantly (During this step it is extremely important to keep stirring as if the caramel burns you will have dark specks in the mixture)
2. Spread the filling mixture over the base, then return to the oven for a further 8 minutes. Place in the pan on a wire rack to cool.


ICING:
1.   Place the Cooking Chocolate and butter in a bowl. Bring a small quantity of water to the boil in a saucepan, remove from the heat and place the bowl firmly on top (I just combined the ingredients in a pan over a moderate heat for faster melting time). Stir until the chocolate and butter melt. Spread the icing over the cooled filling
2.   Wait until the chocolate has totally set before cutting with a hot knife and store in the fridge until serving

Enjoy!


Wednesday, 2 October 2013

Carrot Cake


Now this recipe is the best and worst thing that I could ever post because once you have tasted this you will never be satisfied with any other type of carrot cake. Not only do I absolutely love this cake because of how easy it is to make, but this recipe is an original from the Cheesecake factory and has grated apple, which creates a moister and tastier cake that is sure to please the whole family.


Carrot Cake
Ingredients:
1 Cup Vegetable Oil
2 Cup Sugar
4 Eggs
1tsp Salt
1tsp Baking Soda
2tsp Cinnamon
1 1/2 Baking Powder
3 Cups grated Carrots (about 3 carrots)
2 Large grated apples
1/2 Cup Coconut
2 3/4 Cup Flour

1. Combine the Oil, Sugar and eggs and beat with a fork until combined
2. Sift in the Salt, Baking powder, Baking soda and cinnamon and mix together
3. Add the flour, grated carrots, grated apple and coconut (if you wish to add any nuts add them now)
4. Pour into a lined tin and  bake at 160ยบ for 40 minutes or until an inserted skewer comes out clean.

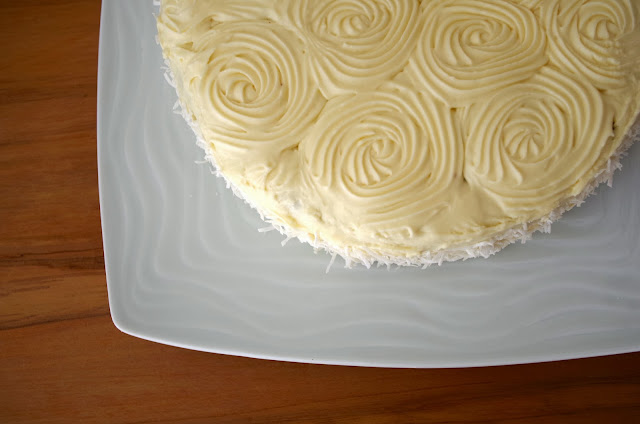
I was pretty eager to try out this 'rose cake' icing technique which has been very popular recently so I used a cream cheese vanilla frosting and a 1M piping tip.


Cream cheese frosting
Ingredients
340g cream cheese, slightly softened
85g unsalted butter, slightly softened
340g icing sugar, sifted
2 teaspoons vanilla extract

Put the butter and cream cheese in the bowl of an electric mixer and beat with the paddle
on medium speed until completely mixed, about 3 minutes, stopping and scraping the bowl
and beater several times.
Decrease the speed to low and add the icing sugar one third at a time, beating until
absorbed after each addition. After the last addition, the frosting might look dry.
Beat in the vanilla and increase the speed to low-medium until the mixture is no longer dry looking, about 2 minutes.
Increase the speed to medium and beat until smooth and light, 4–5 minutes. Use soon after mixing.


                                                       And voila the perfect carrot cake!